Roasting a whole chicken sounds simple, but getting that perfect balance of juicy breast meat and fully cooked thighs is where most home cooks struggle. If you’ve ever carved into a beautifully browned bird only to find dry, stringy breast meat, you’re not alone. The good news? With the right techniques and the help of a wireless meat thermometer with app, you can consistently achieve restaurant-quality results at home.
A whole roasted chicken is a year-round favorite, especially when families start hosting backyard dinners and casual gatherings. Whether you’re cooking for a weeknight meal or a weekend BBQ, mastering this dish is a game-changer.
Why Chicken Breast Dries Out So Easily
The challenge lies in the anatomy of the chicken. The breast meat is lean and cooks faster, while the thighs and drumsticks contain more connective tissue and require higher temperatures to become tender.
l Chicken breast is best at 160-165°F (71-74°C)
l Dark meat (thighs/legs) is better at 175-185°F (79-85°C)
By the time the legs are done, the breast is often overcooked. That’s why timing alone isn’t reliable, you need temperature precision.
Step-by-Step: How to Roast a Whole Chicken Perfectly
Step 1. Start with Proper Preparation
Pat the chicken dry with paper towels. Moisture is the enemy of crispy skin. Season generously with salt, pepper, and your favorite herbs (thyme, rosemary, garlic powder work great). Let the chicken sit at room temperature for 20-30 minutes before roasting. This promotes even cooking.
Step 2. Use the Right Roasting Temperature
Preheat your oven to 425°F (218°C). A high temperature helps crisp the skin while locking in juices. Place the chicken breast-side up on a roasting rack. This allows air to circulate and prevents soggy skin.
Step 3. Truss or Not to Truss?
Trussing (tying the legs together) can help the chicken cook more evenly, but leaving it untrussed allows more heat to reach the thighs. For beginners, skip trussing for better overall results.
Step 4. The Most Important Step: Monitor Internal Temperature
This is where most people go wrong, guessing doneness based on time. Instead, insert a meat thermometer probe into the thickest part of the breast, avoiding bone. This gives you real-time accuracy and prevents overcooking.
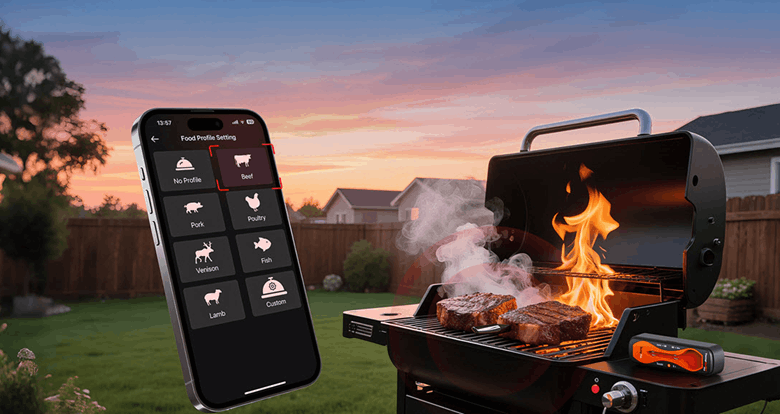
Cooking by time is unreliable because every chicken varies in size, and ovens fluctuate. A meat thermometer removes the guesswork completely. If you want a truly stress-free roasting experience, a wireless meat thermometer is a smart investment, especially for summer cooking when you’re multitasking or entertaining guests. The TempSpike Plus TP970 Wireless Meat Thermometer is designed for modern home cooks who want precision without hassle.
Key Features:
l True Wireless Design: No tangled wires in your oven.
l Wi-Fi & Bluetooth Connectivity: Monitor your chicken from anywhere in your home.
l Dual Sensors: Tracks both internal meat temperature and ambient oven temperature.
l Long Range Monitoring: Perfect for multitasking during BBQs or gatherings.
l App Alerts: Get notified exactly when your chicken hits the perfect temperature.
Roasting requires constant attention, but the TempSpike Plus TP970 lets you step away without risking overcooking. You can prep sides, relax, or even chat with guests while your chicken cooks to perfection. For busy households, especially during summer hosting season, this kind of convenience is invaluable.
Step 5. Pull the Chicken at the Right Time
Remove the chicken when the breast reaches 160-162°F (71-72°C). The temperature will continue to rise to a safe 165°F while resting.
Step 6. Let It Rest
Rest the chicken for 10-15 minutes before carving. This allows juices to redistribute throughout the meat. Cutting too early causes all the moisture to run out, leading to dryness.
Step 7. Bonus Tips for Extra Juicy Chicken
l Butter under the skin: Adds moisture and flavor directly to the breast
l Dry brine overnight: Salt the chicken and refrigerate uncovered for better seasoning and texture
l Use a roasting rack: Prevents steaming and improves airflow
l Avoid constant oven opening: Heat loss leads to uneven cooking
Common Mistakes to Avoid Overcooking Chicken
Many home cooks unknowingly sabotage their results:
l Relying only on cooking time
l Not using a cooking thermometer
l Cooking at too low temperature
l Skipping the resting step
l Overcooking “just to be safe”
With the right tools and knowledge, these mistakes are easy to avoid.
Final Thoughts
Roasting a whole chicken without drying out the breast isn’t about complicated techniques, but it’s about precision and control.
Once you start cooking by temperature instead of guesswork, everything changes. Your chicken becomes juicier, more flavorful, and consistently perfect every time. And with a smart tool like the TempSpike Plus TP970 Wireless Meat Thermometer, you’re cooking with confidence.
This summer, whether you’re hosting a backyard dinner or preparing a simple family meal, mastering roasted chicken will instantly elevate your kitchen skills.